Homemade Recipe Card

Homemade Recipe Card – For Bridal Shower

Upon being asked to write a recipe on a single piece of plain yellow cardstock for inclusion in my soon-to-be niece’s bridal shower cookbook, I couldn’t resist throwing caution to the wind and creating my own, more elaborate recipe card. I suppose most people will write one recipe on one side of the little yellow card and call it good. But I had a vision of creating an interactive card in the colors of the wedding…and incorporating the bridal shower invitation, to boot.

The cover utilizes stamps from Stampin’ Up.  I colored them in with copic markers. The wedding colors are brown and leaf green. I used a piece of light green columns vellum for interest behind the chef. I got the green vellum from a paper sample book from my good friend Vickie (thank you!).

A little pull tab helps keep the card closed. There are a few layers inside the card that hindered it from laying flat when closed. So I created a pull tab mechanism to keep the card nice and tidy.

Bon Appetit is stamped in black and the edges are distressed with Tim Holtz Distress Ink. The brads are from Creative Impressions.

Homemade Recipe Card – The Inside
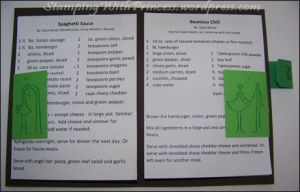
For the inside, I attached recipes on both the left and right panels. I added little green flaps that open outward. The green flaps are of a stick figure couple. These are trimmed from the bridal shower invitation.

You can see the pull tab on the very far right. When pulled, it slides to the right and allows the card to open.

On first glance it appears that I am only providing two recipe’s for the bride-to-be. But I really wanted to give her some of my favorites and oft requested recipe’s. So, in addition to Beanless Chili and Spaghetti Sauce, I have included a couple of desserts.

As this picture shows, I have additional recipe’s below the top card. I couldn’t resist sending her a couple of dessert recipe’s with main dish recipe’s.

Once you open the little green tabs that have the stick figures, you can see the photo I added of the corresponding desserts. The left tab has Chocolate Covered Grahams. The right tab has White Chocolate Chip Macadamia Nut Cookies.

The top recipe is simply attached with a piece of leaf green cardstock behind the bottom recipe. The piece of green cardstock acts as a hinge.

Homemade Recipe Card – The Back

To finish off the card, I  added another portion of the bridal shower invitation. This is adhered with puffy tape (dimensionals) so that I could hide the slider mechanism. That, and it’s a fun way to decorate the back of the card.

The slider is created with puffy tape which creates a track for the slider and also a stop mechanism so that the slider doesn’t come off the card.

I stamped a couple little Stampin’ Up stamps on it and signed the card. I may need to insert a little card to write a note to the bride-to-be because I won’t be able to attend the bridal shower since it’s out of state.

The host is creating  little recipe book. I’m not sure how this will work with that. But hopefully they can make it work!
Stamping Workshop

I’m giving away Copic Markers. Check out my blog candy.

Stamping Workshop – Four Cards – Four Techniques

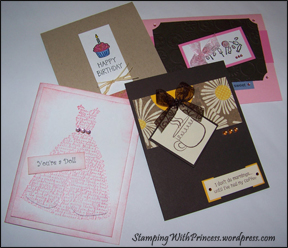
I was invited to lead a stamping workshop for 48 ladies at a women’s retreat this past weekend. I had no information about whether the ladies had any stamping experience. So I needed to keep things simple, yet inspiring. What a great time….and a lot of prep work!

Four cards at workshop

Four distinct cards using four different techniques

The theme of the weekend was “The Sweet Life”. The images that were used to represent that theme included coffee, candy and feminine (such as lipstick, jewelry, etc). So, I taylored some of my cards to incorporate those images. The trick was to create cards that would keep the ladies at their tables (no stations) and that would be economical. Wow, that’s tough for a gal that likes her copic markers and lots of layers.

Stamping Workshop – Card #1 – Regular Stamping

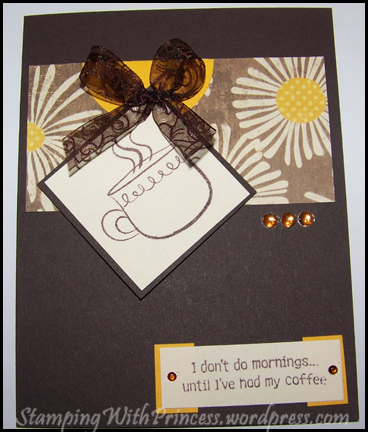
coffee card in brown and daisy's

One of the favorites - coffee!

One of the favorites was this coffee card. It involves staight stamping and assembling.

I did add a bow using ribbon from Creative Impressions. It’s attached with a glue dot.

The gems really finish the card.

I went a bit untraditional with the greeting. Instead of framing the entire greeting with the gold paper, I just used small pieces to accent the left and right. It almost makes the greeting look like it’s enclosed in brackets!

Coffee Card – Supplies

  • Coffee stamps: TPC Studio
  • Paper: The Best of Kay & Company
  • Gold: The Paper Company
  • Brown: Reem from Xpedx
  • Ribbon: Creative Impressions
  • Gems & glue dots

Stamping Workshop – Card #2 – Embossing & Alternate Use of Punch

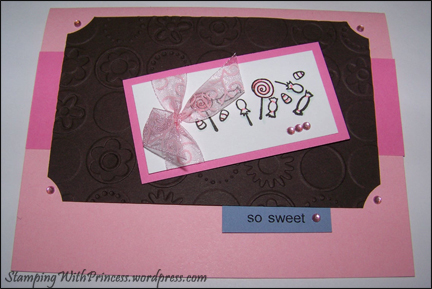
So sweet card in blue and pink and brown

So Sweet - baby or thank you card

I have seen quite a few cards lately using candy. Since the theme of the retreat is “the sweet life” I couldnt’ resist having the ladies make a sweet card.

I did not have a stamp with a candy verse, so I printed the words “so sweet” on my printer. I actually pre embossed everything because I only have one embossing machine (cuttlebug). I taught the ladies how to create rounded corners using a circle punch.

So Sweet Card – Supplies

  • Stamp: Studio G
  • Embossing: Cuttlebug
  • Pink Paper: The Paper Company
  • Brown and Blue: Reems from Xpedx
  • Ribbon: Creative Impressions

Stamping Workshop – Card #3 – Distressing

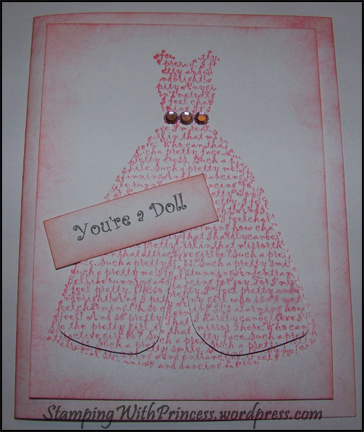
You're a Doll pink dress on white

You're a Doll - thinking of you or thank you card

Here is the card that’s the most feminine of them all. I created something similar to this for my sisters princess bridal shower. The ladies seemed to enjoy this one.

Again, I did not have a stamp that said “You’re a Doll” so I just printed it out on my printer.

My husband thought it too pink. And I really was beginning to question whether to bring it to the retreat. But it was one of the top picks of favorites.

To distress the edges we simply used sponges dabbed in distress ink.

You’re a Doll Card – Supplies

  • Stamp: My Sentiments Exactly
  • Ink: Tim Holtz Distress Ink
  • Gems and Sponge

Stamping Workshop – Card #4 – Paper Piecing

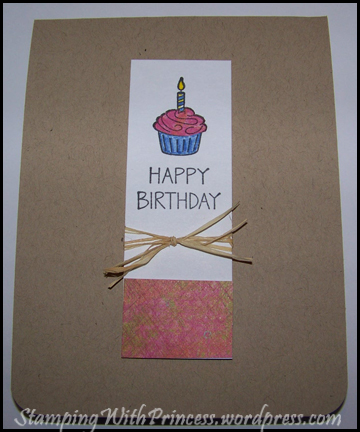
Simple Happy Birthday

Simple Happy Birthday - Could modify for feminine or masculine

Ok, I must confess, I got this card layout from the Paper Crafts Magazine March/April 2010 issue. I love the simple design.

We used a bit of pink decorative paper on the bottom of the white strip and on the frosting.

A few of the ladies asked why we didn’t just use markers on the cupcake. Great question. My answer – to bring the pink from the bottom up to the top.

Yes, I suppose markers could work. Guess I just like to make things a bit more complicated!

Simply Happy Birthday Card – Supplies

  • Stamp: Studio G
  • Paper: The Best of Kay & Company
  • Rafia
  • Ink: Black Versafine, markers
  • Paper: Craft and White – reems from Xpedx

Homemade 3D Shoe – Two

I’m giving away Copic Markers. Check out my blog candy.

Homemade 3D Shoe – Orange and Pink

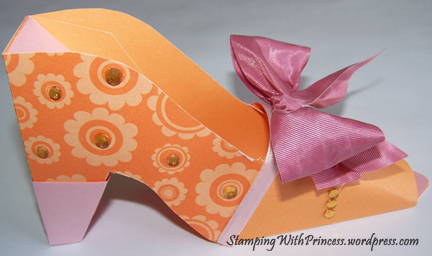
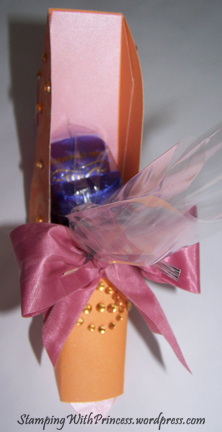
I taught a stamping / cardmaking workshop for 48 ladies at a women’s retreat on Saturday. I homemade a few 3D shoe favors (template by Ellen Hutson) as door prizes. The first lady who won chose this orange and pink shoe.

Homemade 3D high heel shoe party favor in orange and pink

Gems make this 3D shoe party favor sparkle

Orange and pink are not colors I typically put together, but when I saw this big pink ribbon, I couldn’t resist making a bow and adding it to the shoe. I added pink paper to accent the heel and sole of the shoe, which really made everything come together. Of course, the gems really give the shoe sparkle and put this shoe in a class of it’s own! =) The shoe holds a little bag of treats but could easily hold a little sack of bird seed.

Orange and Pink homemade 3D shoe from top

3D shoe party favor holds just a little something.

I just adore this 3D shoe. I think it would make an awesome wedding favor, bridal shower favor, Mother’s Day gift card holder or an awesome party favor at a princess party! I filled this one with a little bag of dove chocolates.

Here is another 3D Shoe.

Homemade 3D Shoe – Supplies

  1. The shoe template is from Ellen Hutson
  2. The orange paper is cheap double sided stock I picked up at Costco a while back.
  3. The ribbon is a scrap I had on hand.
  4. The pink paper is also scrap I had on hand. I think it came from a paper sample book. It’s got a sheen to it.

3D Shoe Wedding Favor

3D Shoe – Party Favor Great for Weddings

This 3D high heel shoe (template from Ellen Hutson) is perfect as a wedding favor or bridal shower favor. Me, I’m creating a few of these as giveaways at a women’s retreat. I’ll be leading a stamping workshop for 48 women and I thought a little random giveaway would be fun.

In case you  haven’t seen my blog candy, view my giveaway here.

wedding favor

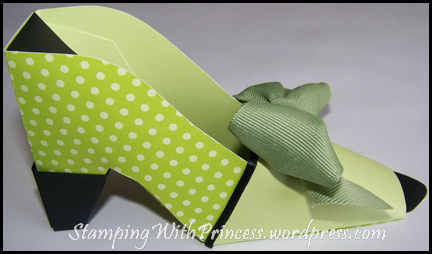
Here I’ve created what I like to think is a very classic shoe. I used some cheap double sided paper that I picked up at Costco eons ago. I covered the top of the toe box with the solid side. Accented several places with black paper and ribbon. Very simple. Ellen Hutson’s pattern doesn’t come with instructions, but the template is pretty straight forward. I used the template that is all one piece. To create the black accents, I just traced around the portion of the template that I wanted. Such as the sole of the shoe and the heel.

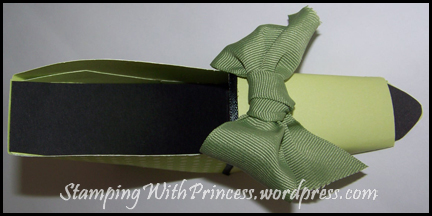
3D homemade high heel shoe View From The Top

Here is a view from the top. The shoe is an open toe shoe, so you can see the black part of the sole sticking out. I had a scrap of green grossgrain in my ribbon box and couldn’t resist making a big bow for the top of the shoe!

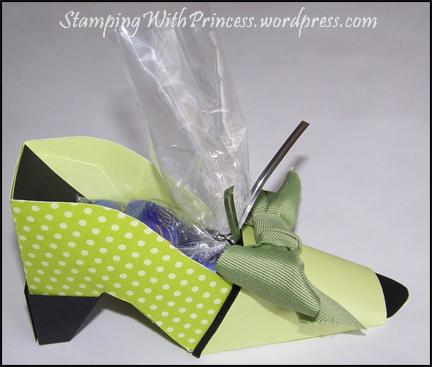
3D Wedding Favor

As I mentioned earlier, this would make a great wedding favor box. Here I have added a little bag of dove chocolates. Of course, with Mother’s Day coming up, this might make a really cute little gift box. Hmmm…maybe use it as a gift card holder???

Tip: The shoe template is a PDF that you can print at home. I print the template on a piece of white cardstock then cut it out. I then traced around the white cardstock template using a stylus so that the paper I will make the shoe from doesn’t have any ink marks.

Wedding Card Class

Homemade Wedding Card Class

I taught a homemade wedding card class on Saturday at my local stamp store (Simple Pleasures) and it was a blast. I had six students and they each made four cards and two favor boxes. Many of the students were suprised at how easy the cards were to make…well, all except for the making of the bow ties! A special thank you to one of my students, a surgeon, who gave me a thank you gift. That was sooo thoughtful!

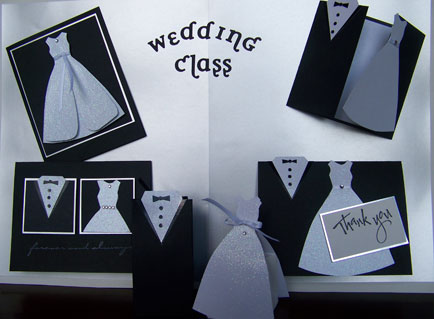
Here was my display board.

Display board of homemade wedding cards

One card many variations

I’ve showcased some of these cards here on my blog, but here was an actual class I taugh. The top left card is for a bridal shower. The bottom right is a card I make in sets of 20 as a gift to newly weds. And the favor boxes might be something you can make for a bridal shower or rehersal dinner. They would be really cute as bird seed holders…if you want to make that many!

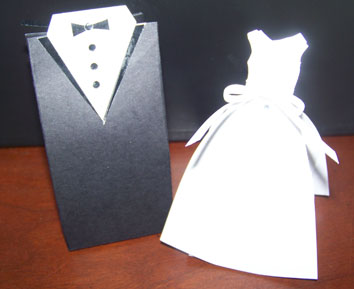
Close-up of Homemade Wedding Favor Boxes

homemade wedding favor boxes in shape of tux and wedding dress

wedding favor boxes make adorable decorations or bird seed containers

These are ordinary 2x2x2 boxes dressed up to look like a tuxedo and a wedding dress. A great twist on a simple box. The dress box really was 2″ all around. The tux box is 4″ tall by 2″ wide.

All the cards were created using My Sentiments Exactly dress stamp W362 which is wood mounted. They sell the dress in a smaller size as part of an acrylic set. The tux shirt was just something I created which is available on a previous post – see link below.

Normally I create the wedding dress for these cards using embossing pad and bridal embossing powder. But for class we stamped the dress image on the back of sparkle white cardstock and cut out. And it worked great.

Here are my other variations of the bride and groom card including video and template:

I also used the dress stamp on some princess themed stuff. Check out my homemade princess creations.

UPDATE: I just found a card on splitcoaststampers.com that modified this basic design. Check it out! It’s gorgeous!

Birthday Magic Box

3D Magic Box as Kit

The latest class I taught was available as a kit (offered at Simple Pleasures). Unfortunately, attendance was low, so it was only available as a kit. If anyone wants to get in on the fun, this kit is $25. It comes with complete instructions and nearly everything you’ll need to complete it.

And pictures? Well, those are available here, of course! =)

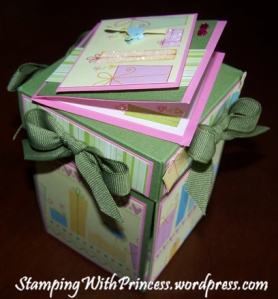
Magic Box in Green, pinks and yellows

Magic Box in Green, pinks and yellows

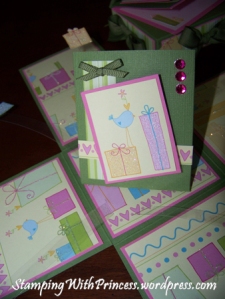
So, here’s the outside of the box. It’s a green box with pink accent and a yellow decorative paper that features pretty packages, bows and birds. This could be used for birthday, bridal shower, baby shower….because there are no words on it. If you need a gift, this is pretty generic. It would work for most any holiday or special occassion.

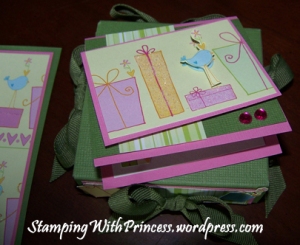
Magic Box Top - Gift Tag

Magic Box Top - Gift Tag

Can you see the glitter I added to two of the packages on the gift tag? I also put green bows on each side of the lid with 1/2″ green ribbon. And who doesn’t love a little bling! =)

Magic Box Gift Card Holder - Close UP

Magic Box Gift Card Holder - Close UP

Again, the packages on the gift card holder have glitter. And so do the ribbons on the side panels. Using a glue pen, I scribbled glue on the paper and sprinkled with glitter. How fun is that! Who needs a glitter stack when you can add glitter yourself! =)

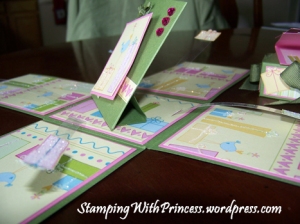
Magic Box Side View

Magic Box Side View

Ok, this side view is very important. Notice the triangle support behind the gift card holder? Not too fancy. And how about the floating presents, do you see the transparency strips I used to hold those? And did you notice those packages have glitter, too?! These things aren’t too difficult, but they add a lot of interest. I made little slits in the center panel and slid the transparency in and secured with adhesive. Easy as can be.

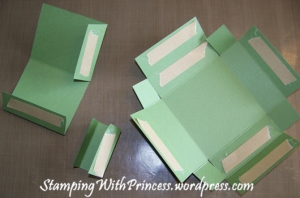
So, for those who would like a few more photos on how it’s done, check these out.

Magic Box Taped and Ready to Go

Magic Box Taped and Ready to Go

With everything scored, cut and folder, here’s where you put the tape on the major pieces. Left is the gift card holder. Middle is the gift card holder support and to the right is the lid.

 
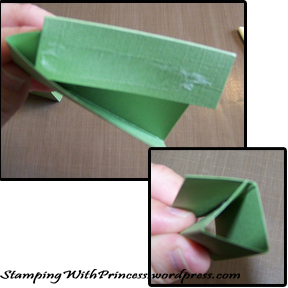
Magic Box Folds

Magic Box Folds

I’m guessing that some of the folds for the gift card holder and the gift card holder support may be tricky, especially for those first timers out there. So here are a couple of photos that I hope will help. The top picture is me tucking the side panel under the bottom part of the gift card holder. The bottom photo is me making a triangle support for the gift card holder.

Supply List:

  • 2 pieces 12×12 Green cardstock
  • 1 piece 12×12 pink cardstock
  • 1 piece 12×12 decorative paper (Heidi Grace)
  • white typing paper
  • gems
  • 1/2″ green grosgrain ribbon (Creative Impressions)
  • 1/8″ green grosgrain ribbon (Creative Impressions)
  • foam tape
  • double sided tape
  • single sided tape
  • craft knife
  • scor-pal
  • scissors
  • Quickie glue pen
  • glitter
  • acetate / transparency sheet
  • Zots

Thank Yous For Bride and Groom

Stamping with Princess – Thank You Cards for Bride and Groom

Help me out here…is it expected or appropriate to bring a gift to a bridal brunch? We brought gifts to the bridal shower. We will be bringing gifts to the wedding. Is another gift required for the bridal brunch; the meeting of all the women in both families? Since we weren’t sure, my mother and I decided to make a set of 2o thank you cards that the bride and groom can use. But I am curious what ettiquite requires. If you know, please leave me a comment.

And has this ever happened to you: you need a card for a special occassion in about a week but you don’t feel inspired? So you wait until the next day and then the next hoping you wake up with an epiphany? Then time runs out and you throw something together even though you still didn’t feel inspired?

Well, that’s what happened to me. I wanted to make a nice simple and fresh set of thank you cards for my nephew’s fiance with a cute itty bitty bride and groom stamp. But nothing I tried looked appropriate. So due to lack of time, I modified the anniversary card I made for my parents from an earlier post.

Though not a totally new design, I love how they turned out. And I think they would make awesome gifts for any couple getting married. Just swap out the blue color for the wedding color. And voila, a cute gift.

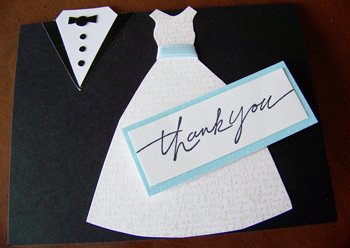
thank you border is the wedding color

thank you border is the wedding color

Unlike the anniversary card, the right side of this card is not cut off. Inside is a piece of typing paper. We (I say we because my mom helped critique the design and then helped mass produce 20 of these) added a ribbon to the front of the dress on this card to mimic the look of the ribbon around the dress of the bride. I was very tempted to add a bow, but that’s not how it will look on the bride’s dress at the wedding, so no bow on the card.

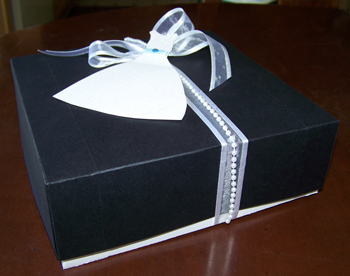
20 of these cards is a bit bulky. So I was going to create a box that was 10 x 7 x 2 that would allow two stacks of cards inside. I did my math wrong and ended up with a box 7 x 7 x 2. So, it was too short to stack the cards side by side. So we made one stack and tied the cards together with blue ribbon to create a tight little bundle. Leaving one loose so the bride can open it, see the whole effect and maybe pass it around for everyone at her Bridal Brunch to see.

Let me just say that although this card looks very simple…it is time consuming. Half way through I was asking myself why I didn’t use two buttons on the shirt instead of three! The shape on the tux shirt is done by hand. I used a compass and ruler (mostly because I enjoy using the compass…and I’m a bit of a perfectionist). The dress shape on this card is different than the anniversary card…because I trimmed around a stamped image (see supply list below).  It’s a lovely image and very easy to cut around. But all the gluing of small pieces on the tux was a little annoying after a while! =) Makes me want to get one of those tools that helps pick up tiny little pieces…it’s only $8 for goodness sake! =)

Boxes and other 3D elements are becoming my new favorite thing to make. I like the fact that the bottom white box, which I created 1/8″ smaller all around, actually peeks out under the black lid. It now looks intentional that the lid is too short! =) Which it wasn’t. Which also meant we had to tie the box together with ribbon or the lid might not stay on very well because of the bulky contents.

Ribbon is tied in a bow and string of plastic pearls accents the ribbon

Ribbon is tied in a bow and string of plastic pearls accents the ribbon

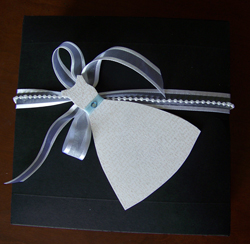
Close up of dress gift tag

Close up of dress gift tag

In the close up, you can see the bow is tucked behind the dress gift tag and that we used the plastic pearl ribbon to accent the white ribbon. And I couldn’t resist adding a gem to the ribbon around the waist of the dress.

Supply list for thank you cards:

  • black matte cardstock for base card
  • white matte cardstock for dress and thank you tag
  • glitter/sparkley white cardstock for tux shirt
  • black shiney cardstock for tux lapel, bow tie and buttons
  • glitter blue cardstock for background of tag
  • typing paper for inside
  • blue ribbon
  • black inkpad
  • embossing pad
  • bridal embossing powder
  • Stampin Up thank you stamp
  • My Sentiments Exactly dress stamp
  • double sided tape
  • mounting tape
  • embossing gun
  • scissors
  • 1/8″ and 1/4″ hole punch for buttons

Supply List for Box and Gift Tag:

  • 3 pieces black matte cardstock for box lid
  • 3 pieces shiney white cardstock for box base
  • 1 piece white matte for gift tag
  • My Sentiments Exactly dress stamp
  • white bridal ribbon
  • white plastic pearl ribbon
  • blue ribbon
  • blue gem
  • bridal embossing powder
  • embossing pad
  • embossing gun
  • scissors
  • double sided tape
  • zots to attach pearl ribbon to bridal ribbon
  • double sided tape
  • scor-pal

Bridal Shower Card

Stamping with Princess – Bridal Shower Card

Before I get started, please take my poll on men. It will open a new window. After you finish taking the poll, close that window and you’ll be right back here. Thanks!

Here’s the card I created for my nephew’s fiance for her bridal shower. This is the same couple I made the magic box for. This could easily be used as a wedding card.

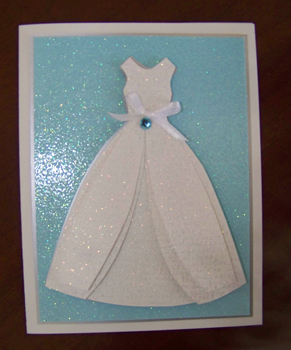
Simple yet elegant wedding dress

Simple yet elegant wedding dress

I created the card using colors from the wedding. I had the advantage of knowing her colors because I designed her wedding invitation! I’ll post that a little later.

The dress is created by stamping the images three times and embossing with bridal embossing powerder and trimming the skirt out and layering with puffy tape. The teal sparkly paper in the background is the same paper used on her wedding invitation. I bordered the teal and the bottom dress with silver paper…also used in her invitation. The teal gem, also left over from the invitations.

I must give credit where credit is due. My husband was instrumental in this design. You see, I had originally just stamped the dress once and placed it on the teal paper. It looked plain and a little boring! Not my usual standard. He suggested I create additional layers to mimic the look of wedding dresses. Yep, that was exactly what it needed. Then when I added the teal gem at the waist line…I knew it was a keeper! =)

Supplies:

  • 1 piece shiney white cardstock (for base card)
  • 1 piece silver cardstock
  • 1 piece matt white cardstock
  • Dress Stamp – My Sentiments Exactly W362
  • Embossing Pad
  • Bridal Embossing Powder (white with glitter)
  • Teal Gem – Martha Stewart
  • White Ribbon
  • Puffy Tape
  • Zots clear adhesive dots to attach ribbon
  • Double sided tape
  • Embossing gun
  • scissors

Princess Party – Guest Thank You Gift

Princess Party – A gift for the Guest Princesses: a Chinese Box?

Princess Party Thank You Gift - A Chinese Box

Princess Party Thank You Gift - A Chinese Box

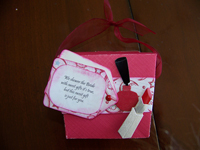
It’s fairly common to give a little thank you gift to everyone who attends a shower. You may think it strange that my mother and I decided to to make thank you boxes in the shape of small chinese take out boxes. But since the Princess Bride-to-be was having an international wedding we decided chinese boxes would be the perfect gift. And since we were having a Princess Bridal Shower, we made all the boxes pink or red!

We decorated the chinese boxes with Jolee’s stickers. My first project using stickers (hey, we got 1,000+ stickers for $7 – I couldn’t help myself). I tend to be more of a purist and only use stamps…but am warming to the idea of incorporating computer generated materials and stickers etc.

Princess Party Thank You Gifts - Chinese Boxes

Princess Party Thank You Gifts - Chinese Boxes

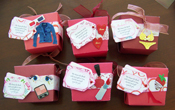
The tag on each box says, “We shower the Bride with sweet gifts it’s true, but this sweet gift is just for you”. I’d love to take credit for this, but I got the poem from a website….which I can’t find right now. We filled the boxes with Hershey Kisses. Each box was decorated a bit differently based on patterned paper and Jolee stickers. We made 20 gift boxes total.

Supplies (for one box):

  • 1 piece pink or red cardstock (8.5×11 is fine)
  • 1 piece patterned paper
  • 1 piece white copy paper
  • Coluzzle tag template
  • Chinese take-out box (I used a small Panda Express Box – and I washed it, of course)
  • stickers
  • 12″ ribbon (I used sheer)
  • Blazing Red StazOn Inkpad
  • 1 red or pink brad
  • Stenciling Brush
  • Exacto / Utility Knife
  • Cutting Board
  • Corner Rounder
  • hole punch
  • stylus
  • scissors
  • super sticky double sided tape
  • temporary double sided tape (optional)
  • puffy tape

Instructions:

  1. Trace the chinese box on a piece if red or pink cardstock using a stylus. (Use a small amount of temporary tape to hold the pattern to the cardstock to prevent the pattern from slipping) You can use a pen, but it won’t look as clean. Cut out using scissors. Cut slit for tab using exacto / utility knife.
  2. Fold into chinese box. Punch a hole on two sides for ribbon near the top of each side panel, but low enough to go through all layers. Unfold and put tape on sides then refold. Feed ribbon through holes and tie a knot on inside. Trim excess ribbon.
  3. Cut out a piece of patterned paper about 1″ wide to wrap around the box. Note: since the box is not square,  you may want to cut each side seperate or create a template for the wrap. Secure to chinese box.
  4. In a wordprocessor, type the poem, “We shower the Bride with sweet gifts it’s true, but this sweet gift is just for you.” to fit on a 1.5 x 1.25 piece of paper. I used Pristina font. Cut out and use corner rounder.
  5. Cut out small coluzzle tag on patterened paper and white copy paper. Using stenciling brush, paint the edges of the two tags and the poem. Tape all three together in layers. Punch hole in tag near top and attach red brad on the tag.
  6. Adhere tag to chinese box with puffy tape and decorate with stickers.
  7. Fill box with candy.

Princess Party Prize – Princess Notebook

Princess Party Prize – A Princess Notebook

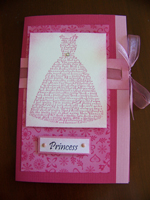
Princess Party Notepad Front

Princess Party Notepad Front

What’s a Bridal Shower without some prizes for the guests?! I was inspired to make decorative notebooks after receiving one from a friend who recently made one at a Stampin’ Up party. I simply modified the idea to fit my princess party.

I purchased 8″x5″ notepads at my local office supply store and used the rubber stamping and scrapbooking supplies I already had at home to decorate it.

Supplies:

  • Dress rubber stamp from My Sentiments Exactly! W362
  • Blazing Red StazOn inkpad
  • 1 piece dark pink cardstock
  • 1 piece light pink cardstock
  • 1 piece white cardstock
  • 1 piece typing paper
  • 1 piece pink patterned paper
  • 2 pink brads
  • 1 clear / white medium gem
  • 2 feet pink ribbon ( I used sheer)
  • exacto / craft knife
  • hole punch and scissors
  • tape and puffy tape
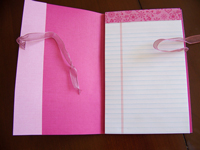
Princess Party Notepad Inside

Princess Party Notepad Inside

Instructions:

  1. Cut dark pink paper to 10×8.  Cut a strip of light pink cardstock to 1×8 and adhere to dark pink so that 1/2 shows. This will now make your dark pink cardstock 10.5×8.
  2. Fold the dark pink cardstock at 5 1/8 and again at 5 3/8 (you may want to score it at these measurements so that it is easier to fold).  Your notepad should fit inside with a little extra on the right side.
  3. Trim the pink patterned paper to 4.25 x 7.25. Adhere to center of cover.
  4. Trim piece of light pink cardstock to 1.5 x 5 1/8. Adhere it to cover horizontally approximately 2.25 from the top.
  5. Create a slit on the light pink cardstock (and through every layer) using the craft knife about 1/4 from the right side allowing a place for the ribbon to feed through. Make a similar slit in the back cover. Feed through ribbon. Adhere ribbon to front and back cover using a clear tape.
  6. Trim white cardstock to 3.75 x 4.5. Stamp dress stamp in center of white cardstock using blazing red stazon inkpad. Dab stencil brush into blazing red stazon inkpad and color the edges of the white cardstock. Adhere to top of cover with puffy tape leaving about 0.5 border all around. Adhere clear gem at waistline of dress.
  7. In word processor print the word princess (I used Pristina font). Trim allowing space on the right and left to insert brads – approximately 2 3/4 x 3/4. Use stencil brush to add some color to the princess tag. Edge with light pink cardstock leaving 1/4 border all around. Punch hole in the left and right side centered vertically. Insert brads. Adhere to notepad cover using puffy tape centered under the dress.
  8. Trim a piece of pink printed paper to 3×5. Adhere to notepad covering the staples at the top. Excess paper should be on the back of the notepad. Tape the notepad to the inside of the cover.
  9. Tie ribbon in a bow which should tie the notepad closed.

Note: You could create a pocket inside the cover to allow the notepad to be changed out once it’s all used up. You would need to make a bigger cover to allow for taping the pocket to the back cover.

« Older entries