Wedding Album Magic Box

Homemade Wedding Album Magic Box

Inspired by a photo album magic box I created for my neighbor to commemorate the 10th birthday party of her twins, I decided to create a wedding album magic box of my outdoor wedding. This is no ordinary magic box. Check it out. 

First up, the video. I have lots of photos of the box, but don’t want this video to get buried.

Wedding Album Magic BoxIf you look really close, you can see the details of my wedding. We had a camping wedding weekend. Tent camping Friday night as well as the wedding ceremony took place at Painted Rocks Campground (just outside Woodland Park, CO).

S’more’s on Friday night and the reception Saturday evening were held at Camp Elim (also just outside Woodland Park, CO).

Though we had a casual outdoor wedding, I wore a fully beaded wedding dress. Only 5 people knew I was going to wear a traditional wedding dress. I insisted that I was going to wear jeans to my own wedding because I dispise dressing up so much. Not even my husband knew I was wearing a dress until I walked down the isle.

Side View of Outside of Wedding Album Magic Box

The magic box is created on a 12×12 piece of black cardstock. I covered the sides with silver swirl decorative paper from Jo-Ann which is framed in silver cardstock. Adorning the sides of the magic box is black grossgrain ribbon from Creative Impressions. I also used pearl gems and white wedding ribbon from Jo-Ann. I also have a silver heart created using a QuicKutz die.

All four sides and the lid are decorated with these elements.

Wedding Album Magic Box – Inside 

The wedding album opens up much like a traditional magic box.

Wedding Magic Box Open

When you remove the lid from the magic box, the four sides fold out flat. But if you look at the center of the box, there is another box waiting to be opened. I used a piece of acetate (transparency) to hold the sides of the second layer up so that you can see all the photos in the first layer…..or can you.

Actually, each side panel is a pocket and there are photos tucked inside them. I created little pull tags with cream cord (Creative Impressions) and a pull tag (homemade with a small circle punch and hand written “pull”). Check it out.

Wedding Album Magic box 1st Layer All OpenNot only are there hidden pockets behind each photo, but the photo itself swings open much like a door to reveal a larger photo inside. I used heart brads to keep the photos closed. Then when you swing the brad around, it allows the photo to open to reveal the second photo behind.

The sides of the second box also have photos on them. All told, this 1st layer of the wedding album has 16 photos.

Wedding Album Magic Box – Second Layer

If you think the first layer is pretty fancy, wait until you see what surprises I have for the second layer!

Wedding Album Magic Box 2nd Layer RevealedAgain, this layer looks a lot like a tradtional magic box. It even has floating hearts (floaters are so magic box). In this photo you can see the clear lid that was holding the second layer up.

In the very middle of the magic box is a little booklet. It’s held in place by an acetate (transparency) box.

Again, you can see little heart brads holding the photos closed. Because you know they are going to open just like the first layer. But wait…what are the little pieces of ribbon sticking out under them???

Wedding album Magic Box with All Layers OpenYes, the photos open to reveal a second photo…but there are also photos attached by the heart brad that swing out! The little white ribbon is actually a pull tab to swing the photo out.

This layer of the wedding album has 15 photos. As you may or may not be able to see, the inside is decorated using the same materials as the outside. We have ribbon, pearls, heart brads, in addition to the same decorative paper.

But wait. There are still more photos. We haven’t looked at the little book in the very center of the magic box.

Wedding Album Magic Box – Center Booklet

Wedding Album close up of clear box holding bookletThe booklet in the center is held in place by an acetate box. The booklet is tied closed with a piece of wedding ribbon.

I chose to decorate the front cover with the names of all the wedding party. I simply printed that out on my home computer/copier.

This photos also shows you a side view of the floating hearts. The hearts themselves are stuck to a thin piece of acetate which is attached to the base of the center of the magic box.

Wedding Booklet OpenPull out the booklet and untie the ribbon to see the first two photos. These were our engagement photos.

In this photo you can see a little tag I created entitled “the Engagement”. I created it on my computer and printed on my copier. It’s matted with a piece of silver cardstock.

I actually have little tags like this throughout the wedding album magic box. I think it adds interest but also descibes the various parts of the event for people who may not have attended the wedding or know our families very well.

Wedding Book Fully OpenWhen the wedding booklet is fully open, you can see four additional photos from the wedding. There is a small piece of decorative paper on the bottom portion. I didn’t want to decorate the inside too much or the booklet wouldn’t fold well.

Back of the Wedding BookletThe back of the booklet is a great shot of us walking down the “aisle” after the ceremony. I thought it fitting to put a picture of our backsides on the back of the booklet.

I also stamped a little greeting that says, “Happily Ever After”. It’s framed in a piece of silver cardstock. Here you can see the ribbon that ties the booklet closed.

More Magic Boxes

I have created other magic boxes and have a FREE Magic Box Tutorial here for the simplified magic box. Sorry, no template yet for this tricked out version. To see more than the ones listed below, click the Magic Box category on the left.

Wedding Album Magic Box – Supplies

  • 35 photos
  • black cardstok
  • silver cardstock
  • silver swirl decorative paper (Jo-Ann)
  • black grossgrain ribbon (Creative Impressions)
  • wedding ribbon (Jo-Ann)
  • white pearl gems
  • heart brads (Creative Impressions)
  • Heart Die (QuicKutz)
  • Acetate (Write on Transparency from office supply store)
  • Happily Ever After stamp (All Night Media)

Magic Box – Christmas Grunge

Magic Box – Christmas Grunge

I had one more request to hold a magic box class at Simple Pleasures – my local independent stamp store. I held my first Christmas Magic Box class in July 2009, but a few students missed it. The paper I used for the summer class was discountinued, so I had to create a new box for my fall class. So here it is for all to see.

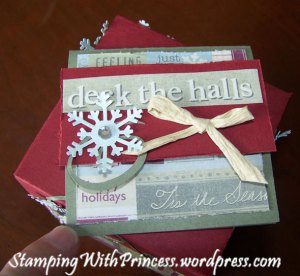
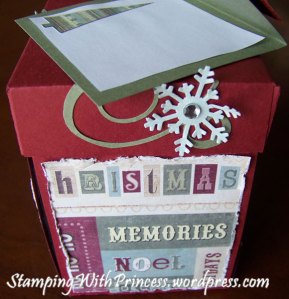
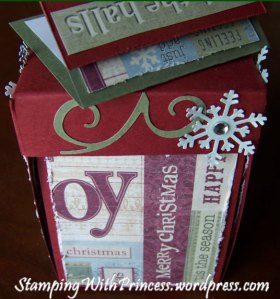
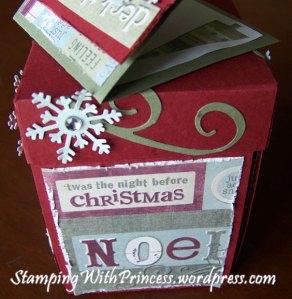
I call it Christams Grunge because I distressed all the decorative paper with a razor blade. One could use the blade of a pair of scissors, or heck, they make special distressing tools. That’s on my wish list. I originally chose this paper because it allowed me to make a red box – which seems more traditional for christmas. It didn’t meet my mom’s approval, however, because it’s not elegent. So, I guess there’s no compromize – you can’t dress up grunge!

Magic Box – Christmas Grunge Outside

magic box christmas grunge lid

Lid of the Magic Box Christmas Gruge

The lid top is deocrated with a square gift tag.

Side 1 of my Magic Box Christmas Grunge

I used Sizzix swirl die cut for the sides of the lid. Just trimmed one or two swirls per side.

Magic Box Christmas Grunge Side 2
Side 2 of Magic Box Christmas Grunge

I used a Martha Steward snow flake punch to decorate the sides as well as the inside.

Magic Box Christmas Grunge Side 3
Side 3 of the Magic Box Christmas Grunge

No snowflake is complete without a gem or something sparkly!

Magic Box Christmas Grunge Side 4
Side 4 of the Magic Box Christmas Grunge

The trick to adhering the swirl is to use a glue pen. And because it’s a small element, place your glue on the die cut in dots, as opposed to trying to draw a line of glue. Just a little tip!

Magic Box Christmas Grunge Inside

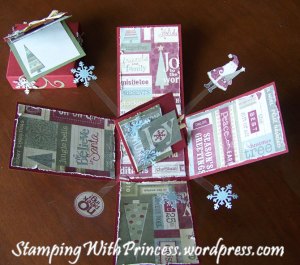
Of course, the magic happens when the lid is removed from the box. The sides spring open and lay flat revealing a christmas scene in the middle. I have a gift card holder surrounded by christmas grunge floating shapes.

Magic Box Christmas Grunge Inside
Inside the Magic Box Christmas Grunge

I incorporated some snow flakes into the inside of the box. Brings continuity to the project.

Magic Box Christmas Grunge Gift Card Holder
Close up of Magic Box Christmas Grunge Gift Card Holder

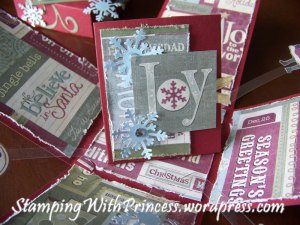
Here’s a close up of the gift card holder. I added a tiny bit of ribbon and some snowflakes and gems.

Magic Box Christmas Grunge Support
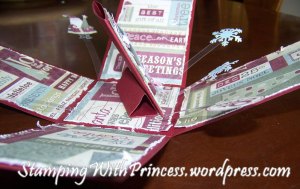
Photo of the support of the Magic Box Christmas Grunge

Here is a photo illustrating the mechanics of the project. I use a triangle wedge to support the gift card holder. I poke the transparency / acetate into the bottom decorative paper to support the floating christmas grunge elements.

Believe it or not, I only used three piece of 12×12 to make the box. One piece of decorative paper and two pieces of red cardstock (one for the lid and one for the box). I used accents of blue and green paper here and there. No stamping on this one.

Check out all the other Magic Boxes on my blog!

Birthday Magic Box

3D Magic Box as Kit

The latest class I taught was available as a kit (offered at Simple Pleasures). Unfortunately, attendance was low, so it was only available as a kit. If anyone wants to get in on the fun, this kit is $25. It comes with complete instructions and nearly everything you’ll need to complete it.

And pictures? Well, those are available here, of course! =)

Magic Box in Green, pinks and yellows

Magic Box in Green, pinks and yellows

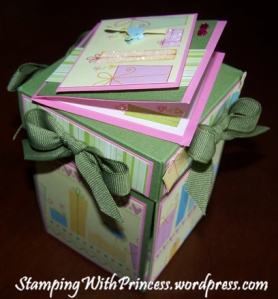
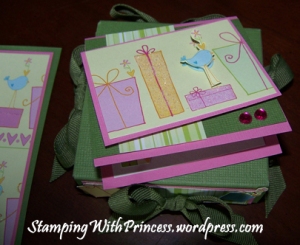
So, here’s the outside of the box. It’s a green box with pink accent and a yellow decorative paper that features pretty packages, bows and birds. This could be used for birthday, bridal shower, baby shower….because there are no words on it. If you need a gift, this is pretty generic. It would work for most any holiday or special occassion.

Magic Box Top - Gift Tag

Magic Box Top - Gift Tag

Can you see the glitter I added to two of the packages on the gift tag? I also put green bows on each side of the lid with 1/2″ green ribbon. And who doesn’t love a little bling! =)

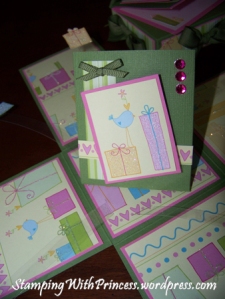
Magic Box Gift Card Holder - Close UP

Magic Box Gift Card Holder - Close UP

Again, the packages on the gift card holder have glitter. And so do the ribbons on the side panels. Using a glue pen, I scribbled glue on the paper and sprinkled with glitter. How fun is that! Who needs a glitter stack when you can add glitter yourself! =)

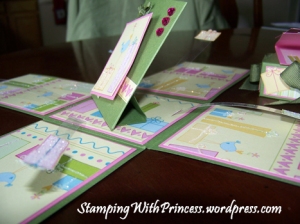
Magic Box Side View

Magic Box Side View

Ok, this side view is very important. Notice the triangle support behind the gift card holder? Not too fancy. And how about the floating presents, do you see the transparency strips I used to hold those? And did you notice those packages have glitter, too?! These things aren’t too difficult, but they add a lot of interest. I made little slits in the center panel and slid the transparency in and secured with adhesive. Easy as can be.

So, for those who would like a few more photos on how it’s done, check these out.

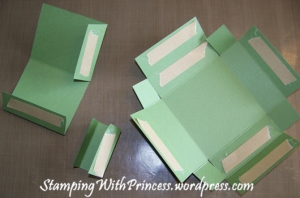
Magic Box Taped and Ready to Go

Magic Box Taped and Ready to Go

With everything scored, cut and folder, here’s where you put the tape on the major pieces. Left is the gift card holder. Middle is the gift card holder support and to the right is the lid.

 
Magic Box Folds

Magic Box Folds

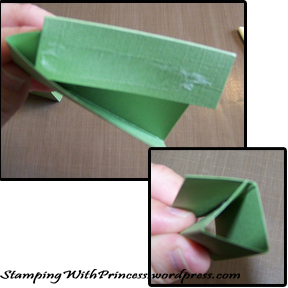
I’m guessing that some of the folds for the gift card holder and the gift card holder support may be tricky, especially for those first timers out there. So here are a couple of photos that I hope will help. The top picture is me tucking the side panel under the bottom part of the gift card holder. The bottom photo is me making a triangle support for the gift card holder.

Supply List:

  • 2 pieces 12×12 Green cardstock
  • 1 piece 12×12 pink cardstock
  • 1 piece 12×12 decorative paper (Heidi Grace)
  • white typing paper
  • gems
  • 1/2″ green grosgrain ribbon (Creative Impressions)
  • 1/8″ green grosgrain ribbon (Creative Impressions)
  • foam tape
  • double sided tape
  • single sided tape
  • craft knife
  • scor-pal
  • scissors
  • Quickie glue pen
  • glitter
  • acetate / transparency sheet
  • Zots

Magic Box for Jenn

Magic Box for Jenn

Remember my trendy friend from Denver? The one I made three birthday cards for! Well, she came to visit me yesterday and we stamped for 7 hours! Way fun! One of the projects we made was a 3D magic box for her sister-in-law. I say we made, but she made it…I used the paper cutter and told her how to make the box, she did all the creative part. I think she did a fabulous job. See for yourself!

To see my other magic boxes, select magic box from my left side bar. Here’s a link to the gal in England that originally designed them.

Great job on this box, Nadeen! Jenn is going to love it. Love ya, looking forward to seeing you again soon!

Top of the Box

Top of the Box

Box open with the lid to the side

Box open with the lid to the side

Close up of the gift card holder in the center square

Close up of the gift card holder in the center square

Glitter Pen provides some accent to the patterned paper

Glitter Pen provides some accent to the patterned paper

The 3D magic box is really quite easy to make. But it does take a chunk of time. I’d highly recommend that you only make this for someone who will appreciate your creative effort. The paper is from DCWV. We also used gems, ribbon, glitter pen and acetate. We used “Take It Easy” alpha die cut from Sizzix. Love it!

My other Magic Boxes.      The Original Magic Box.

Magic Box – Secrets Revealed

Stamping with Princess – Magic Box Secrets Revealed

Before I get started, please take my poll on men. It will open a new window. After you finish taking the poll, close that window and you’ll be right back here. Thanks!

I’ve had several people inquire about the card holder and the floating shapeson my 3D Magic Box. I apologize for not sharing a picture of the profile of the box…which I think may answer most of your questions.

Side view of the gift card holder and closeup of floating flowers and hearts

Side view of the gift card holder and closeup of floating flowers and hearts

As you can see, I created a triangle shaped support for the base of the card holder. Because the gift card holder leans back when it’s attached to the triangle, you will want to place it as far forward as possible so the sides of the box have room to fold up and close.

Additionally, I hope you can make out how the flowers and hearts are floating. I have them attached to strips of acetate (transparency sheets). I cut slits into the center square and inserted the acetate strips into that. So they are sprouting from the bottom center square. I used Zots (clear adhesive dots) to attach the die cut to the acetate.

The daisy flowers and heart are both QuicKutz die cuts which I used in my cuttlebug.

I trust the photo and explanation has helped some!

I will be teaching a class in July on how to make the magic boxes in Colorado Springs. If you would like me to send you a kit, please leave me a comment. The kits include the instructions/tutorial, paper (pre-scored) and accessories (such as ribbon and gems). You will need to provide your own glue/tape and scissors. I will be adding a shopping cart to this site in a week or two so you can purchase through paypal.

Glad you enjoy this project! Here’s the original Mother’s Day Magic Box.

Magic Box – Mother’s Day Gift Card Holder

Stamping with Princess – Magic Box Mother’s Day Gift Card Holder

Before I get started, please take my poll on men. It will open a new window. After you finish taking the poll, close that window and you’ll be right back here. Thanks!

Now, the minute I saw that Gift Card Holders was one of the categories for the Mother’s Day Challenge at Moxie Fab World I knew what I was going to make. A 3D magic box using the same paper I used on my mom’s birthday card. This time, the box is for my mother-in-law. If my mom liked the paper….does that mean my mother-in-law will too?

Here’s the box:

Here's a close up of the lid. You may not be able to tell, but each side panel is decorated slightly differently

Here's a close up of the lid. You may not be able to tell, but each side panel is decorated slightly differently

Decorated with beautiful papers, a little ribbon, lots of gems and a cute little button. But the fun really takes shape when you remove the lid and open the box!

When open, the magic box lays flat.

When open, the magic box lays flat.

Can you make out all the details? All the little gems I’ve added? The cute little gift card holder in the center. Let me give you a close up.


Close up of the Gift Card Holder.

Close up of the Gift Card Holder.

Now, what about the floating hearts and daisy’s? Here’s a close up of those, too!

Close up of the floating hearts and daisy's

Close up of the floating hearts and daisy's


One piece of 12×12 decorative paper dresses up both the inside and outside panels of the box. The box itself required two pieces of 12×12. One for the lid and one for the base. Then there’s one more piece of paper as a frame around each panel. So that’s 4 pieces of paper total.

Again, my husband took a short video of the box so you can see it in motion.

I noticed that I forgot to add a picture of the profile so that you can see how everything is attached. Please see this post for the details.

Supplies:

  • 1 piece 12×12 green cardstock DCWV
  • 2 pieces 12×12 teal cardstock DCWV
  • 1 piece light blue glitter cardstock
  • 1 piece 12×12 decoratve paper
  • 1 piece acetate (transparency sheet)
  • ribbon
  • gems
  • button
  • die cut heart QuicKutz
  • die cut daisy QuicKutz
  • die cut alphabet QuicKutz Soph
  • Happy Mothers Day stamp Hero Arts Mother’s Day Message C2962
  • decorative scissors
  • zots
  • doube sided tape
  • grommets

Magic Box – Wedding

Stamping with Princess – Magic Box for My Nephew’s Wedding

This 3D magic box was one of those handmade items that I had to make as soon as I saw it. Below is my interpretation of the magic box made specifically as a gift card holder for my nephew who will be getting married in a few weeks.

Here is the outside of the box.

Here is the outside of the box.


When you pull the top of the box off, the box springs open and flat revealing bows and hearts in mid air!

A view of the box with the lid off.

A view of the box with the lid off.


I made bows from wedding ribbon purchased at Joann. The hearts are die cut from silver cardstock using QuicKutz die in my Cuttlebug. The stamp is a wedding cake colored with an aquapen in teal…the color of my nephew’s wedding. The paper was purchased at Joann.

When I originally showed my husband pictures of magic boxes he looked at me and said, “what’s the point?”. Being cute doesn’t justify a pretty box in his mind. So I decided to make mine into a gift card holder. Now that it has a purpose, he likes it!

Now, let me give credit where credit is due. I first saw this magic box on Split Coast Stampers. This gal, Dolly Watt, has made several magic boxes and was my inspiration. After digging around, I found the original creator at http://www.magic-boxes.com/.

My husband also made a short, short video on youtube of it so you can see it’s moving parts and pieces. Please note that in the video I got the web address wrong for the original creator of the box. Boxes should be plural as in more than one box. You can see the original at www.magic-boxes.com.